FreeIPA is a free and open source identity management tool, it is the upstream project for Red Hat identity manager. Using FreeIPA tool, we can easily manage centralized authentication along with account management, policy (host-based access control) and audit. FreeIPA also provides the services like DNS and PKI.
FreeIPA is based on the following Open Source projects,
- 389 Directory Server(LDAP)
- MIT Kerberos
- SSSD
- Dogtag (Certificate System)
- NTP & DNS

In this article we will demonstrate how to install and configure FreeIPA tool on CentOS 7 Server. Following are the details of my test Lab Server (CentOS7),
- IP Address = 192.168.0.102
- Hostanme = ipa.linuxtechi.lan
- RAM = 2 GB
- CPU =2 vCPU
- Disk = 12 GB free space on /
- Internet Connection
Step:1 Set static Hostname and apply updates
Set the static host name of your server using the hostnamectl command,
[root@localhost ~]# hostnamectl set-hostname "ipa.linuxtechi.lan"
[root@localhost ~]# exec bash
[root@ipa ~]#
Update the server using yum update command and then reboot it
[root@ipa ~]# yum update -y;reboot
Step:2 Update the hosts file (/etc/hosts)
Run the below echo command to update /etc/hosts file, replace the ip address and hostname as per your setup.
[root@ipa ~]# echo -e "192.168.0.102\tipa.linuxtechi.lan\t ip" >> /etc/hosts
[root@ipa ~]#
Step:3 Install FreeIPA packages using yum command
FreeIPA packages and its dependencies are available in the default package repositories. As we are planning to install integrated DNS of FreeIPA, so we will also install “ipa-server-dns”
Run the below command to install FreeIPA and its dependencies
[root@ipa ~]# yum install ipa-server ipa-server-dns -y
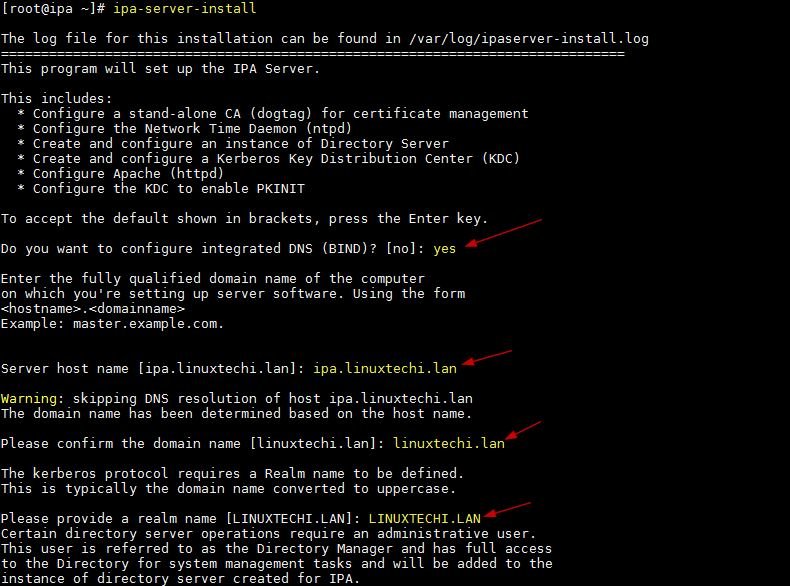
Step:4 Start the FreeIPA Installation setup using “ipa-server-install”
Once the packages are installed successfully then use the below command to start the freeipa installation setup,
It will prompt couple of things like to configure Integrated DNS, Host name, Domain Name and Realm Name
[root@ipa ~]# ipa-server-install
Output of above command would be something like below
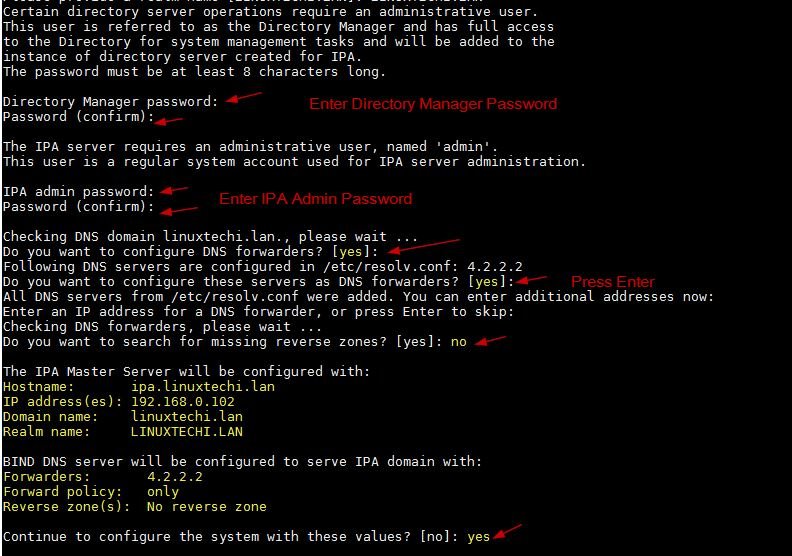
After pressing yes in above window, it will take some time to configure your FreeIPA server and once it has been setup successfully then we will get output something like below,
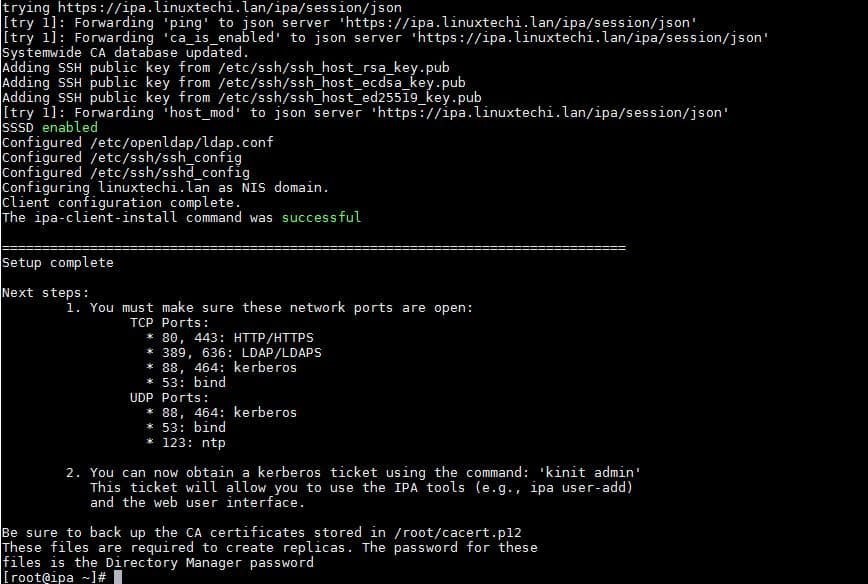
Above output confirms that it has been installed successfully.
Run the below command to allow User’s home directory creation automatically after authentication (or login)
[root@ipa ~]# authconfig --enablemkhomedir --update
[root@ipa ~]#
Note: In case you get the below errors while installing FreeIPA on CentOS 7 server,
.............
[error] CalledProcessError: Command '/bin/systemctl start certmonger.service' returned non-zero exit status 1
ipa.ipapython.install.cli.install_tool(CompatServerMasterInstall): ERROR    Command '/bin/systemctl start certmonger.service' returned non-zero exit status 1
ipa.ipapython.install.cli.install_tool(CompatServerMasterInstall): ERROR    The ipa-server-install command failed. See /var/log/ipaserver-install.log for more information
.................
This seems to be known issue on CentOS 7, so to resolve this we have restart dbus service (service dbus restart) and uninstall freeipa using the command “ipa-server-install –uninstall” and then again try to install.
Step:5 Allow FreeIPA ports in OS Firewall
In case OS firewall is running on your centos 7 server then run the beneath firewall-cmd commands to allow or open ports for FreeIPA,
[root@ipa ~]# firewall-cmd --add-service=freeipa-ldap
success
[root@ipa ~]# firewall-cmd --add-service=freeipa-ldap --permanent
success
[root@ipa ~]# firewall-cmd --reload
success
[root@ipa ~]#
Step:6 Verification & Access FreeIPA admin portal
Use the below command to check whether all services of FreeIPA are running or not
[root@ipa ~]# ipactl status
Directory Service: RUNNING
krb5kdc Service: RUNNING
kadmin Service: RUNNING
named Service: RUNNING
httpd Service: RUNNING
ipa-custodia Service: RUNNING
ntpd Service: RUNNING
pki-tomcatd Service: RUNNING
ipa-otpd Service: RUNNING
ipa-dnskeysyncd Service: RUNNING
ipa: INFO: The ipactl command was successful
[root@ipa ~]#
Let’s verify whether admin user will get token via Kerberos using the kinit command, use the same password of admin user that we supplied during FreeIPA installation.
[root@ipa ~]# kinit admin
Password for admin@LINUXTECHI.LAN:
[root@ipa ~]# klist
Ticket cache: KEYRING:persistent:0:0
Default principal: admin@LINUXTECHI.LAN
Valid starting       Expires              Service principal
11/26/2018 07:39:00  11/27/2018 07:38:55  krbtgt/LINUXTECHI.LAN@LINUXTECHI.LAN
[root@ipa ~]#
Access the FreeIPA admin portal using the URL:
https://ipa.linuxtechi.lan/ipa/ui
Use the user name as admin and the password that we specify during the installation.

Click on Login

This confirms that we have successfully setup FreeIPA on CentOS 7 Server. It also conclude the article, please do share your feedback and comments.
In the upcoming article we will see how a Ubuntu machine can be registered on FreeIPA for Centralize authentication.