Pacemaker is a High Availability cluster Software for Linux like Operating System.Pacemaker is known as ‘Cluster Resource Manager‘, It provides maximum availability of the cluster resources by doing fail over of resources between the cluster nodes.
Pacemaker use corosync for heartbeat and internal communication among cluster components , Corosync also take care of Quorum in cluster.
In this article we will demonstrate the installation and configuration of two Node Apache (httpd) Web Server Clustering using Pacemaker on CentOS 7.
In my setup i will use two Virtual Machines and Shared Storage from Fedora Server ( two disks will be shared where one disk will be used as fencing device and other disk will used as shared storage for web server )
- node1.linuxtechi.com ( 192.168.1.51 ) — CentOS 7.x
- node2.linuxtechi.com (192.168.1.52 ) — CentOS 7.x
Step:1 Update ‘/etc/hosts’ file
Add the following lines in /etc/hosts file in both the nodes.
192.168.1.51 node1.linuxtechi.com node1
192.168.1.52 node2.linuxtechi.com node2
Step:2 Install the Cluster and other required packages.
Use th below yum command on both the nodes to install cluster package (pcs ), fence-agents & web server (httpd)
[root@node1 ~]# yum -y update
[root@node1 ~]# yum -y install pcs fence-agents-all iscsi-initiator-utils httpd

[root@node2 ~]# yum -y update
[root@node2 ~]# yum -y install pcs fence-agents-all iscsi-initiator-utils httpd
Step:3 Set the password to ‘hacluster’ user
It is recommended to use the same password of ‘hacluster’ user on both the nodes.
[root@node1 ~]# echo <new-password> | passwd --stdin hacluster
[root@node2 ~]# echo <new-password> | passwd --stdin hacluster
Step:4 Allow High Availability ports in firewall.
Use ‘firewall-cmd‘ command on both the nodes to open High Availability ports in OS firewall.
[root@node1 ~]# firewall-cmd --permanent --add-service=high-availability
success
[root@node1 ~]# firewall-cmd --reload
success
[root@node1 ~]#

[root@node2 ~]# firewall-cmd --permanent --add-service=high-availability
success
[root@node2 ~]# firewall-cmd --reload
success
[root@node2 ~]#
Step:5 Start the Cluster Service and authorize nodes to join the cluster.
Lets start the cluster service on both the nodes,
[root@node1 ~]# systemctl start pcsd.service
[root@node1 ~]# systemctl enable pcsd.service
ln -s '/usr/lib/systemd/system/pcsd.service' '/etc/systemd/system/multi-user.target.wants/pcsd.service'
[root@node1 ~]#

[root@node2 ~]# systemctl start pcsd.service
[root@node2 ~]# systemctl enable pcsd.service
ln -s '/usr/lib/systemd/system/pcsd.service' '/etc/systemd/system/multi-user.target.wants/pcsd.service'
[root@node2 ~]#
Use below command on either of the node to authorize the nodes to join cluster.
[root@node1 ~]# pcs cluster auth node1 node2
Username: hacluster
Password:
node1: Authorized
node2: Authorized
[root@node1 ~]#
Step:6 Create the Cluster & enable the Cluster Service
Use below pcs commands on any of the cluster nodes to create a cluster with the name ‘apachecluster‘ and node1 & node2 are the cluster nodes.
[root@node1 ~]# pcs cluster setup --start --name apachecluster node1 node2
Shutting down pacemaker/corosync services...
Redirecting to /bin/systemctl stop pacemaker.service
Redirecting to /bin/systemctl stop corosync.service
Killing any remaining services...
Removing all cluster configuration files...
node1: Succeeded
node2: Succeeded
Starting cluster on nodes: node1, node2...
node2: Starting Cluster...
node1: Starting Cluster...
Synchronizing pcsd certificates on nodes node1, node2...
node1: Success
node2: Success
Restaring pcsd on the nodes in order to reload the certificates...
node1: Success
node2: Success
[root@node1 ~]#
Enable the Cluster Service using below pcs command :
[root@node1 ~]# pcs cluster enable --all
node1: Cluster Enabled
node2: Cluster Enabled
[root@node1 ~]#
Now Verify the cluster Service
[root@node1 ~]# pcs cluster status

Step:7 Setup iscsi shared Storage on Fedora Server for both the nodes.
IP address of Fedora 23 Server = 192.168.1.21
Install the required package first.
[root@fedora23 ~]# dnf -y install targetcli
I have a new disk (/dev/sdb) of size 11 GB on my fedora server on which i have created two LV one for Fecing and other is for Apache file system.
[root@fedora23 ~]# pvcreate /dev/sdb
 Physical volume "/dev/sdb" successfully created
[root@fedora23 ~]# vgcreate cluster_data /dev/sdb
 Volume group "cluster_data" successfully created
[root@fedora23 ~]# lvcreate -L 1G -n fence_storage cluster_data
 Logical volume "fence_storage" created.
[root@fedora23 ~]# lvcreate -L 10G -n apache_storage cluster_data
 Logical volume "apache_storage" created.
[root@fedora23 ~]#
Get the Initiator Names of the both nodes.
[root@node1 ~]# cat /etc/iscsi/initiatorname.iscsi
InitiatorName=iqn.1994-05.com.redhat:63ba7391df7f
[root@node1 ~]#

[root@node2 ~]# cat /etc/iscsi/initiatorname.iscsi
InitiatorName=iqn.1994-05.com.redhat:d4337e65531e
[root@node2 ~]#
Now use ‘targetcli‘ command to configure iscsi storage for both nodes.
[root@fedora23 ~]# targetcli
/> cd /backstores/block
/backstores/block> create apache-fs /dev/cluster_data/apache_storage
/backstores/block> create fence-storage /dev/cluster_data/fence_storage
/backstores/block> cd /iscsi
/iscsi> create
/iscsi> cd iqn.2003-01.org.linux-iscsi.fedora23.x8664:sn.646023b9e9c6/tpg1/luns
/iscsi/iqn.20...9c6/tpg1/luns> create /backstores/block/apache-fs
/iscsi/iqn.20...9c6/tpg1/luns> create /backstores/block/fence-storage
/iscsi/iqn.20...9c6/tpg1/luns> cd ../acls
/iscsi/iqn.20...9c6/tpg1/acls> create iqn.1994-05.com.redhat:63ba7391df7f
/iscsi/iqn.20...9c6/tpg1/acls> create iqn.1994-05.com.redhat:d4337e65531e
/iscsi/iqn.20...9c6/tpg1/acls> cd /
/> saveconfig
/> exit

Start & enable the target service
[root@fedora23 ~]# systemctl start target.service
[root@fedora23 ~]# systemctl enable target.service
[root@fedora23 ~]#
Open the iscsi ports in the OS Firewall.
[root@fedora23 ~]# firewall-cmd --permanent --add-port=3260/tcp
success
[root@fedora23 ~]# firewall-cmd --reload
success
[root@fedora23 ~]#
Now Scan the iscsi storage on both the nodes :
Run below commands on both the nodes
# iscsiadm --mode discovery --type sendtargets --portal 192.168.1.21
# iscsiadm -m node -T iqn.2003-01.org.linux-iscsi.fedora23.x8664:sn.646023b9e9c6 -l -p 192.168.1.21:3260
Replace the target ‘iqn’ and ‘ip address’ as per your setup. After executing above command we can see two new disk in ‘fdisk -l’ command output.

List the ids of newly scan iscsi disk.
[root@node1 ~]# ls -l /dev/disk/by-id/
total 0
..........
lrwxrwxrwx. 1 root root 9 Feb 21 03:22 wwn-0x60014056e8763c571974ec3b78812777 -> ../../sdb
lrwxrwxrwx. 1 root root 9 Feb 21 03:22 wwn-0x6001405ce01173dcd7c4c0da10051405 -> ../../sdc
[root@node1 ~]#
Start and enable iscsi service on both the nodes.
[root@node1 ~]# systemctl start iscsi.service
[root@node1 ~]# systemctl enable iscsi.service
[root@node1 ~]# systemctl enable iscsid.service
ln -s '/usr/lib/systemd/system/iscsid.service' '/etc/systemd/system/multi-user.target.wants/iscsid.service'
[root@node1 ~]#

[root@node2 ~]# systemctl start iscsi.service
[root@node2 ~]# systemctl enable iscsi.service
[root@node2 ~]# systemctl enable iscsid.service
ln -s '/usr/lib/systemd/system/iscsid.service' '/etc/systemd/system/multi-user.target.wants/iscsid.service'
[root@node2 ~]#
Step:8 Create the Cluster Resources.
Define stonith (Shoot The Other Node In The Head) fencing device for the cluster. It is a method to isolate the node from cluster when node become unresponsive.
I am using 1 GB iscsi storage (/dev/sdc ) for fencing.
Run the following commands on either of the node :
[root@node1 ~]# pcs stonith create scsi_fecing_device fence_scsi pcmk_host_list="node1 node2" pcmk_monitor_action="metadata" pcmk_reboot_action="off" devices="/dev/disk/by-id/wwn-0x6001405ce01173dcd7c4c0da10051405" meta provides="unfencing"
[root@node1 ~]#
[root@node1 ~]# pcs stonith show
 scsi_fecing_device (stonith:fence_scsi): Started node1
[root@node1 ~]#
Now Create a partition on second iscsi storage (/dev/sdb) that will be used as document root for our web server.
[root@node1 ~]# fdisk /dev/disk/by-id/wwn-0x60014056e8763c571974ec3b78812777

Format the newly created partition :
[root@node1 ~]# mkfs.ext4 /dev/disk/by-id/wwn-0x60014056e8763c571974ec3b78812777-part1
Mount the new file system temporary on /var/www and create sub-folders and set the selinux rule.
[root@node1 html]# mount /dev/disk/by-id/wwn-0x60014056e8763c571974ec3b78812777-part1 /var/www/
[root@node1 html]# mkdir /var/www/html
[root@node1 html]# mkdir /var/www/cgi-bin
[root@node1 html]# mkdir /var/www/error
[root@node1 html]# restorecon -R /var/www
[root@node1 html]# echo "Apache Web Sever Pacemaker Cluster" > /var/www/html/index.html
Umount the file system now because cluster will mount the file system when required.
[root@node1 html]# umount /var/www/
[root@node1 html]#
Create the Web Server file system Cluster Resource using below pcs command.
[root@node1 html]# pcs resource create webserver_fs Filesystem device="/dev/disk/by-id/wwn-0x60014056e8763c571974ec3b78812777-part1" directory="/var/www" fstype="ext4" --group webgroup
[root@node1 html]#
[root@node1 html]# pcs resource show
 Resource Group: webgroup
 webserver_fs (ocf::heartbeat:Filesystem): Started node1
[root@node1 html]#
Add the following lines in ‘/etc/httpd/conf/httpd.conf’ file on both the nodes.
<Location /server-status>
 SetHandler server-status
 Order deny,allow
 Deny from all
 Allow from 127.0.0.1
</Location>
Open the httpd or web server port in OS firewall on both the nodes
[root@node1 ~]# firewall-cmd --permanent --add-service=http
success
[root@node1 ~]# firewall-cmd --reload
success

[root@node1 ~]#
[root@node2 ~]# firewall-cmd --permanent --add-service=http
success
[root@node2 ~]# firewall-cmd --reload
success
[root@node2 ~]#
Create Virtual IP (IPaddr2) Cluster Resource using below command. Execute the following command on any of the node.
[root@node1 ~]# pcs resource create vip_res IPaddr2 ip=192.168.1.151 cidr_netmask=24 --group webgroup
[root@node1 ~]#
Create Apache Cluster Resource using below Command :
[root@node1 ~]# pcs resource create apache_res apache configfile="/etc/httpd/conf/httpd.conf" statusurl="http://127.0.0.1/server-status" --group webgroup
[root@node1 ~]#
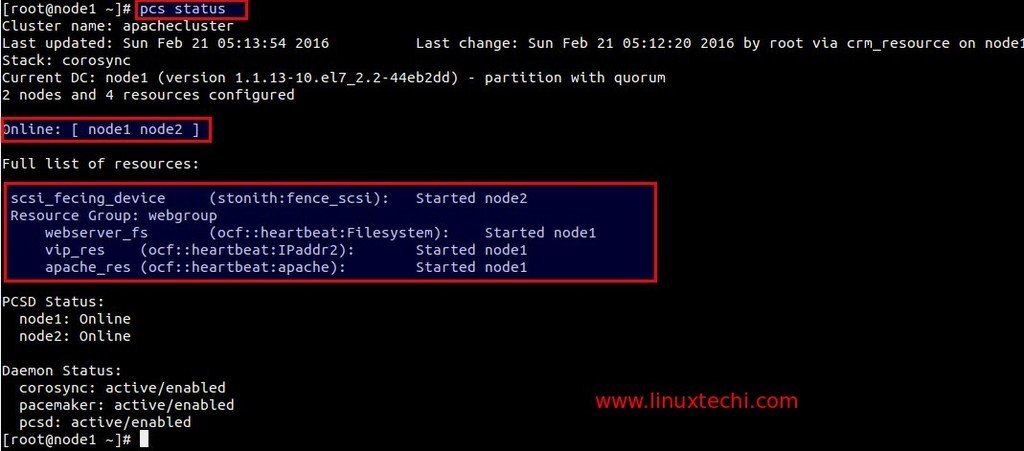
Verify the Cluster Status :
[root@node1 ~]# pcs status
Use ‘df‘ and ‘ip add‘ command to verify the file system and ip address failover.
Now Try to access the web site using vip (192.168.1.151 ).
Pacemaker GUI :
GUI of Pacemaker can be accessed from web browser using vip.
https://192.168.1.151:2224/

Use the user name ‘hacluster’ and its password that we set in above step.
Add the existing Cluster nodes.


Installation and Configuration of Pacemaker is completed Now, Hope you have enjoy the steps. Please share your valuable feedback & comments 
Reference : http://clusterlabs.org/quickstart-redhat.html